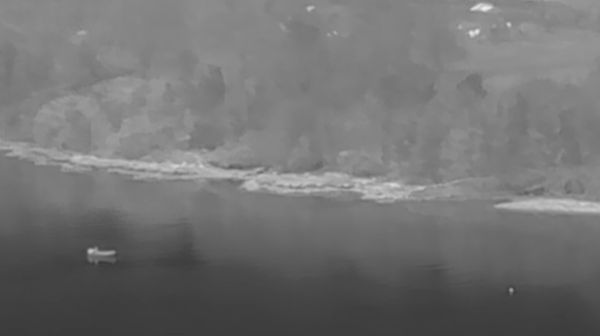
Here’s a nice story on the BBC. I had never really thought about the value of drones for search and rescue, but on the River Foyle they have one equipped with a thermal camera, which can really help find people in the river, especially at night.
Here’s a nice story on the BBC. I had never really thought about the value of drones for search and rescue, but on the River Foyle they have one equipped with a thermal camera, which can really help find people in the river, especially at night.
Yesterday evening, I got a toy that many of my friends and family were surprised that a gadget enthusiast like me hadn’t been seduced by many years ago!
And today, I took it for a walk. I’m very pleased to discover that Tilly doesn’t seem at all fazed by the drone, only by the fact that I’m not paying enough attention to her.
It’s a tribute to how good the technology is, that a complete amateur like me can produce a pretty video on the first day. Having the sunshine and a light dusting of snow helped a lot too, though!
I missed this at the time, but there was a lovely presentation put together for the Hogmanay New Year’s Celebrations in Edinburgh, using a swarm of drones carrying lights.
A short summary video is here:
but it is really worth watching the full presentation, which you can find here, with music and narration.
You don’t want to think too much about the fact that the effect was really only visible from one location, or that they weren’t allowed actually to film the Edinburgh scenes over the city so they had to do it in a remote bit of the Highlands and overlay it on images of the Edinburgh skyline… It’s still a lovely combination of software, hardware and poetry.
P.S. It turns out that there have been quite a few of these type of displays in recent months, if you search YouTube for ‘drone light show’. But most of them aren’t narrated by David Tennant 🙂
Now that I have a shiny new iPhone, I’ve realised that I can finally start playing with NFC tags, and, in particular, they can do interesting things around the house by making them trigger actions in my Home Assistant system.
I do alread have various Zigbee buttons around the house, and in general these are more convenient, since you can just press them without needing a phone in your hand! There are a couple in the sitting room, for example, which toggle our ‘movie mode’. When movie mode is switched on, the lights in the hall, kitchen and sitting room dim to a low warm glow, any lights that reflect in the TV screen turn off completely, the temperature in the room is raised by a degree or two, and the TV & DVD player switch on. When movie mode is switched off, everything reverts to its previous state. I don’t want to have to pull out a phone to do this; it’s much easier to turn it on and off with a button, or to use voice. “Alexa, it’s movie time!”
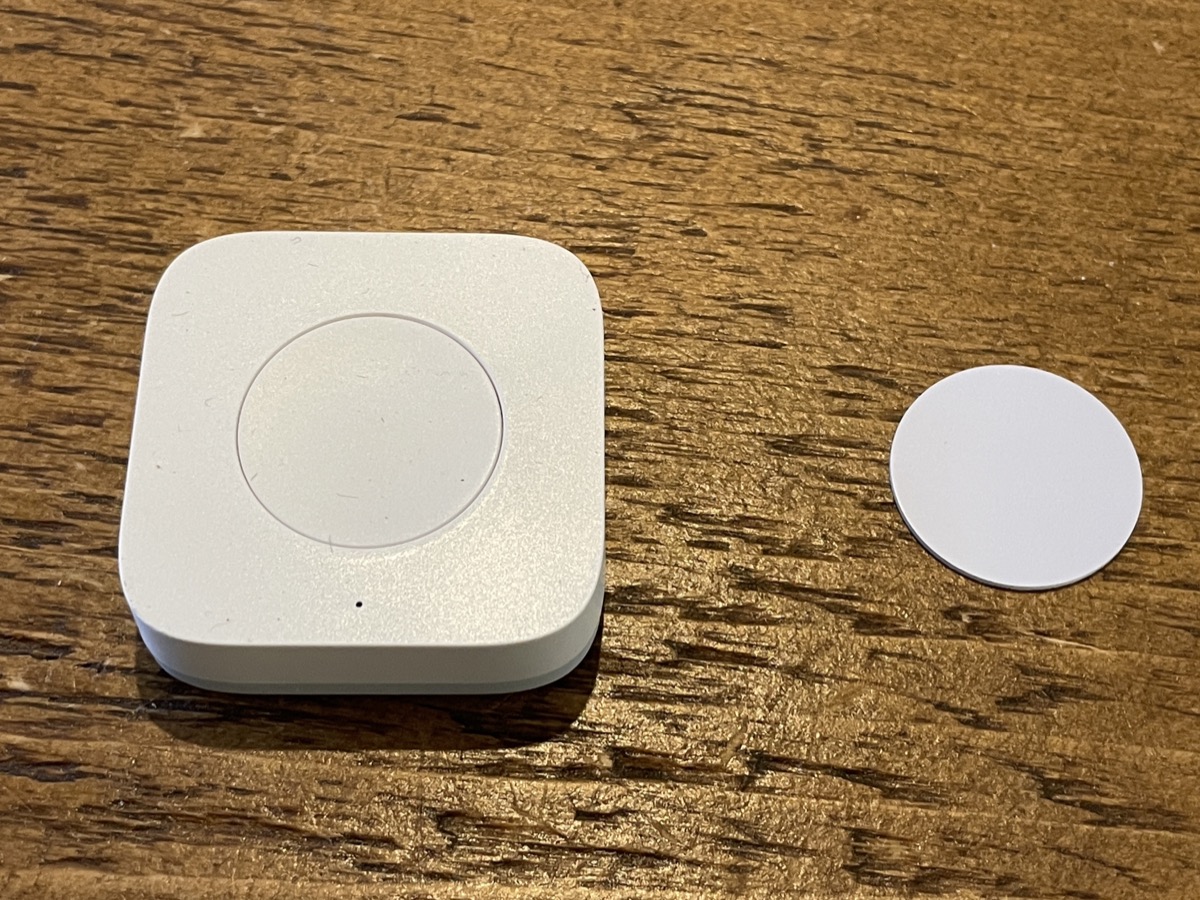
A Xiaomi Zigbee button on the left; one of my NFC tags on the right. The NFC tag is an inch in diameter.
But if you don’t mind pulling out your phone, NFC tags have some key advantages: they’re small, weatherproof, require no battery and can do more things. You can also arrange that they do different things depending on who’s scanning them, so, for example, you could stick one beside your garage door; when you scan it, it unlocks your car, when your spouse scans it, it unlocks theirs, and when anyone else scans it, it does nothing (or perhaps causes your security camera to take a photo of them!)
NFC tags each have a fixed unique ID, and for simple interactions you can just arrange that your phone does something when a particular ID is scanned.
But they can also be programmed with custom data using a protocol/format known as NDEF. There are standard ways of storing URLs, phone numbers, etc, much as you would with a QR code. So if you want a tag to take you to a web page, for example, without your phone needing to know anything about the tag in advance, this is a good way to do it.
If you want to experiment with this, then the Simply NFC app is a good place to start. Another good and completely free one is NFC TagWriter by NXP, but for the particular issue of reading things with an iPhone, I had more luck with Simply NFC. And a key thing to know if you’re using small tags is that the NFC reader is at the top of the back of your phone near the camera, and this needs to be within about a centimetre of the tag.
Recent iPhones will read a subset of these tag types in the background (i.e. without you having to run an app). As an example, I’ve just programmed a tag here with my email address (a mailto: link), and if I scan it, a notification pops up offering to take me to the mail app to send a message. I can do this with my iPhone at the home screen, or even the lock screen. More complex email variants, though, (for example, including an email subject line), don’t seem to work without running a special app.
Recent versions of the Home Assistant app know how to program NFC tags, and scan them, and associate them with Home Assistant actions. This is very cool, and gives you lots of information about who’s doing the scanning, etc.
But it has a problem on iOS: Apple doesn’t let an NFC tag perform an action on your phone without your confirmation. So instead of just pulling out your phone and tapping it on the tag, you also need to look for the resulting notification and confirm that you want the action to take place, which spoils the magic a bit. This isn’t an issue, I gather, on Android, but Apple are more cautious about doing things behind your back, especially, I guess, since an NFC tag could be hidden and yet still accidentally scannable.
However, there is one way to allow tags to perform actions on an iPhone without requiring your confirmation each time.
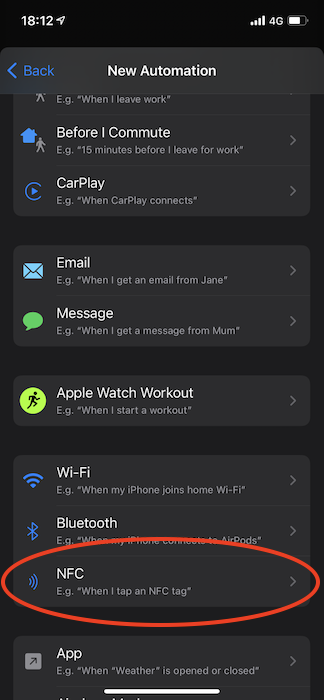
If you create an ‘automation’ on your iPhone using the Shortcuts app (not to be confused with a Home Assistant automation), you can choose to trigger this with an NFC tag.
You don’t need to program the tag: this just uses its ID, I think.
Now, an iPhone automation can do all sorts of things, including requesting a URL. And Home Assistant allows you to create webhooks which can trigger Home Assistant automations in response to a URL being requested.
You can find information on how to create a Home Assistant webhook online, depending on whether you create your automations through the GUI or using YAML. Here’s my simple example called study_toggle, which toggles both ceiling lights in my study:
- alias: Toggle study lights
  trigger:
    - platform: webhook
      webhook_id: study_toggle
  action:
    - service: homeassistant.toggle
      entity_id: light.q_study_back
    - service: homeassistant.toggle
      entity_id: light.q_study_front
I can cause this automation to be run using the URL `/api/webhook/study_toggle’ on my Home Assistant server.
NOTE: It’s important to remember that webhooks don’t require authentication, so if your server is at all accessible to the outside world you should make sure you use more obscure URLs! Please don’t have one called http://homeassistant.me.org/api/webhook/open_garage!
OK, back to the iPhone. Now, your phone will need to make an HTTP POST request to that URL, but fortunately, this is easy to do. When adding an action to your automation, go into the ‘Web’ section and use ‘Get contents of URL’:
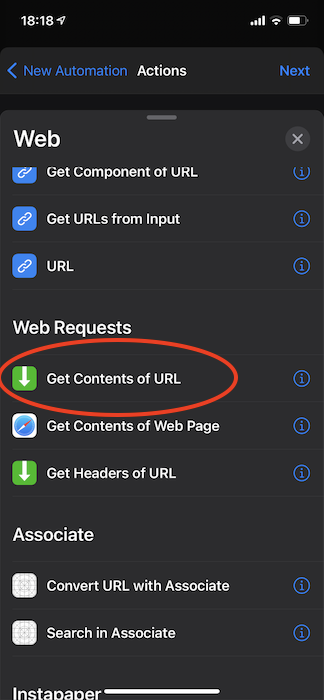
Then you can put in the URL and expand the ‘Show more’ section, which will let you change the HTTP method from GET to POST.
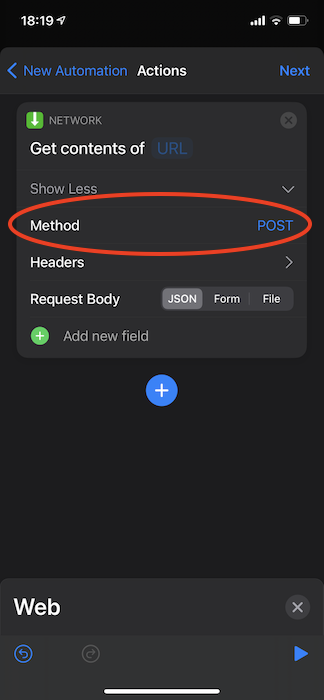
There’s no need to send any data in the request body, but you can add some JSON if you wish to make use of it in Home Assistant.
And that’s basically it! Make sure you turn off the ‘Ask Before Running’ option on the automation.
Now, the first time you scan the tag, it will still ask you for confirmation, but it’ll also give you the option not to be asked in future, at which point you can just tap the tag to run the action. Your phone does need to be unlocked.
If you use Nabu Casa’s Home Assistant Cloud, they make it easy to get a long obscure URL which will link to your webhook and which will be accessible from anywhere. (If you set this up on your Mac, you’ll really want your ‘Universal Clipboard‘ enabled so you can copy on the Mac and paste on the phone!)
This is handy if you might want to put the tag somewhere away from your home, e.g. if it’s the last thing you scan before you leave the office to notify your spouse that you’re on the way. I’ve also heard of people sticking tags to their car dashboard which will open or close the garage door.
But if you’re only using the tag to control things when you’re actually at home, you’ll make it a lot more snappy if you keep everything on your local network, don’t go via lots of proxies, and you could even use an IP address to avoid a DNS lookup. So my actual tag to toggle my study lights calls a URL which is something like:
http://192.168.0.30:8123/api/webhook/study_toggle_x65fedwibble
and it’s pretty much instantaneous.
Have nothing in your house that you do not know to be beautiful, or believe to be useful, or can connect to Home Assistant .
If buying for others, you may need two of the above.
If you have a USB microphone, it’s easy to plug it into your computer. But if you have an analog one, intended to be used with anything other than a computer — say, a camera, sound system or voice recorder — the chances are that it may not work, unless your computer has a dedicated microphone socket.
My Macs have a headset socket, into which you can plug combined earbud/microphone combinations such as you might get with your phone. But it tends to think that anything else you plug in there is just a pair of headphones, and that you probably want to keep using the built-in mic on the machine.
I did some experiments to work out how to persuade it to use an external microphone. It’s not one of my slickest videos, but it should serve its purpose!
Update, a few days later:
Even though the above solution works, it’s almost certainly easier, if you don’t have a microphone socket on your computer, to use a USB audio adapter, like this one.
I was hesitant about this, because I wasn’t sure of the likely quality of the analog-to-digital converters in a cheap USB peripheral, but it turns out to work very well for normal use. That would be my recommendation now, if you have a spare USB socket!
One of the big challenges facing lecturers in the University here is that, for at least the next term and probably the whole academic year, all of the lectures need to be recorded. Most of the small-group teaching, practical sessions, and so forth will be going ahead — with extensive Covid-prevention measures in place — but there’s no way we can pack big lecture halls full of people in the way we’ve become accustomed to over the last few centuries, so lectures will all be delivered online this year.
One aspect of my University job recently has been to find and evaluate some of the kit people might want to use for recording, either at home, or in the meeting rooms in the department that we’re equipping for this purpose. (At home, the sitting room has been converted into a recording studio for the 21 lectures Rose needs to get on disk!)
I’ve been making videos of some of my tests and experiments, mostly for internal use, but some of them might be helpful to others. If you should be considering purchasing a USB desk-standing microphone, for example, you might be interested in one of my recordings from yesterday:
I’ve been gathering some of these into a YouTube playlist as well:
Recording Equipment for Lockdown Lectures
I’ll add more there in due course, so do subscribe to my channel if it might be of interest.
I’ve been experimenting with a Sony ZV-1. This is a compact yet very capable camera, and if I wanted to purchase something explicitly for vlogging, this might well be it. Assuming I wanted to spend 700 quid in the process, of course.
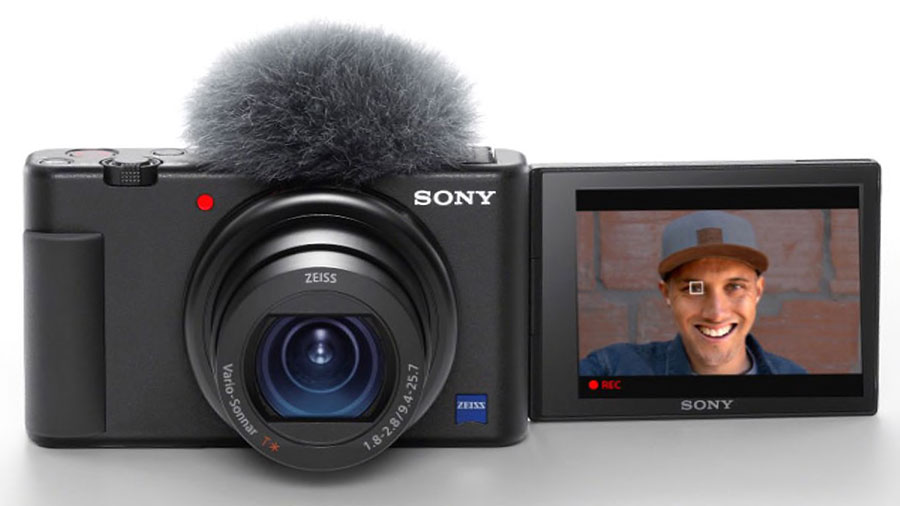
Yesterday, I took it with me while walking the dog, and was really quite impressed. In the process, I produced a video which talks too much about a particular bit of Cambridgeshire for those who are interested in cameras, and too much about cameras for those primarily interested in walks in Cambridgeshire.
I fear the overlapping set in this Venn diagram may be rather small, but it was for my own interest more than anyone else’s; I’ll just put it here just in case there should turn out to be anyone else in that small and exclusive club of South Cambs Vlogging Dog Walkers…
(Most of the audio is recorded using an Instamic)
New toy! I bought an Instamic: a tiny voice recorder that I wanted to use in situations where conventional microphones might be difficult or a nuisance, especially when I’m recording with my GoPro Max, which has no facility to take an external mic input.
Here’s my quick first test on yesterday’s dog-walk, in case it’s of interest!
Today’s very quick tip for improving your video calls.
This one’s pretty obvious, of course. You won’t need to be told this. But perhaps you’ll have a friend who does?
This project at UCLA is such an intriguing idea. And using today’s hardware and software, not too hard to implement.
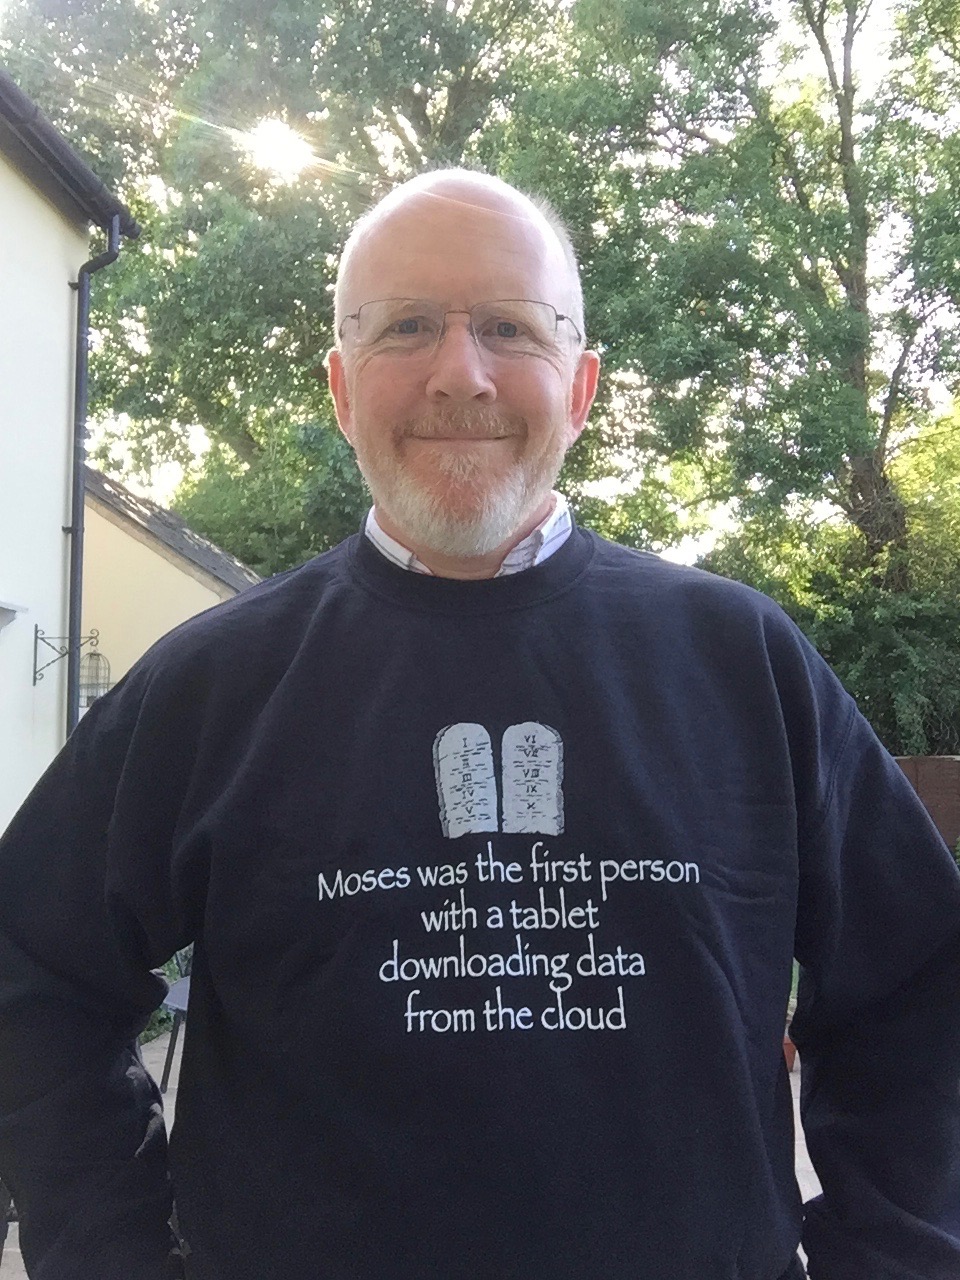
I received a rather nice gift from my in-laws today:
© Copyright Quentin Stafford-Fraser
Recent Comments